
ALL MATERIAL COPYRIGHT KEVIN SCOTT 2011. LINKS TO THIS SITE ARE WELCOME BUT DO NOT COPY MATERIAL FROM THIS SITE TO ANY OTHER WEBPAGE.


If you find this site useful, please support it by making a donation of $1 to help maintain and develop it. Click on the PAYPAL DONATE button to do this safely. But there is no obligation - please avail yourself of the information and facilities of the site at no charge.

So-called stick barometers were popular in the latter half of the 19th century and represent one of the simplest construction of a mercury barometer. Usually mounted in a polished mahogany or oak case, they consisted of a vertical glass tube about 80cm in length, sealed at the upper end, and teminating at the lower, in a reservoir, referred to as a 'cistern'. The inverted tube and the cistern are intially nearly filled with clean mercury and then sealed and returned to the upright position, whereupon the mercury level in the tube falls to a point at which the hydrostatic pressure exerted on the mercury in the cistern exactly balances the atmospheric pressure. Any variation in the latter, will thus cause the level of mercury in the vertical tube to change correspondingly so the mercury level can be used to monitor the atmospheric pressure.
The stick barometer was never intended as a precision scientific instrument, but as a domestic asset to enable local weather forecasting. Thus, the absolute reading of the height of the mercury column was less important than the magnitude and direction of the changes in the mercury height. None-the-less, some stick barometers were provided with an adjustment screw at the base to allow the reading of the mercury height to be set to a particular position on the scale. This might be used to adjust the reading to correspond to the pressure at sea level, even if the location of the barometer was at some altitude above.
Should the barometer tube be required to be replaced, the diameter should be a reasonable match to the original. The outside diameter is more critical in this respect than the bore, on account of the mounting saddles through which it must pass. The inside diameter is a compromise between a wide diameter which will minimise the surface tension error of the barometer and the volume capacity of the tube which if too great will introduce a significant level change in the cistern which will again impair accuracy. Around 4mm bore might be considered an optimum.
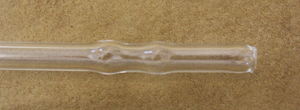
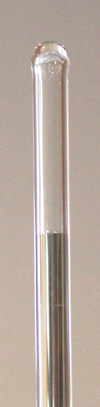
If the cistern is to be made of leather (see below), it is preferable that the lower end of the barometer tube be provided with two bulbs separated by about 15mm and situated about 30mm from the open end of the tube. These bulbs provide a secure location for the joint with the leather cistern. They are, however, dispensable if an existing tube is to be used which is not provided with them.
Leather has the very useful property of being impervious to mercury and freely pervious to air. But strictly, not all leather has this characteristic. Thin chamois leather can allow mercury to pass through it and this has been exploited as a means of cleaning mercury from foreign bodies and dross. Moreover, leather used for barometer cisterns must also be highly flexible, resistant to cracking and thin enough to allow it to be fashioned into a small, leakproof vessel. These characteristics are well met in thin pigskin of which a sample was obtained and tested for both impermeability to mercury and permeability to air.
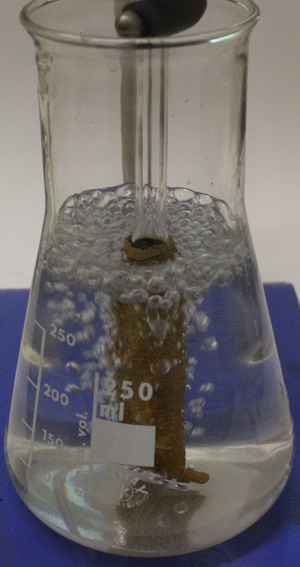
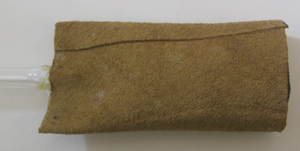
For this purpose a thimble was constructed by cutting a rectangle of the leather 50mm x 40mm and forming it into a cylinder along the longer edge. A proprietary leather glue was used to secure the joint which was made with a 5mm overlap between the surfaces. One end was cemented closed and a glass tube was cemented to the other. Air at low pressure (0.5 psi) was supplied to the thimble which was held under the surface of water. A copious flow of air was observed. The thimble was then dried and filled with mercury and left for 24 hours in a glass beaker. The hydrostatic pressure of the mercury at the lower end of the thimble was about 1 psi. No mercury was observed to have passed through the leather. These experiments are illustrated in the photographs below:


Having verified the suitability of the leather, the construction of the cistern can now be tackled. A square of the leather is cut with 100mm side. It is rolled around a cylindrical former about 28mm in diameter and the overlap glued using the proprietary leather glue. This should form very secure and strong joints with some flexibility. The type of glue used to make repairs in leather upholstery in automobiles is suitable.
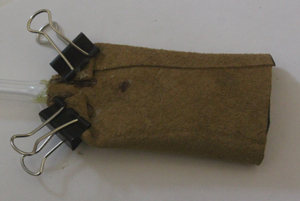
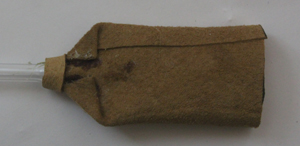
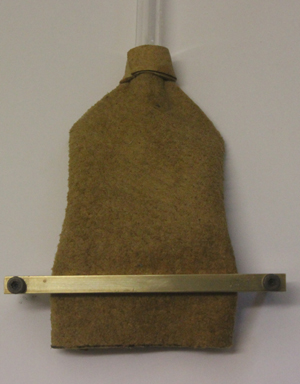
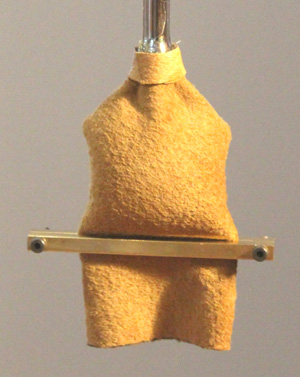
When the glue has securely set, the leather cylinder so formed is attached to the barometer tube, locating the joint between the bulbs and leaving about 25mm of barometer tube projecting into the leather cylinder. The glass is coated with glue as is the inside edge of the leather cylinder and the latter is pinched tightly to the barometer tube and held using bulldog clips until the glue is set. The two glued edges are then turned down and cemented in place to form an approximately triangular top to the cistern with the barometer tube passing through the apex. A strip of leather about 8mm wide is then coated with glue and wrapped around the joint between the cistern and the tube, to provide further strength to the joint.
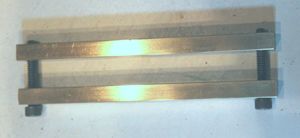
A brass clamp is prepared consisiting of two 75mm lengths of 3/16 inch square brass stock drilled and tapped at each end for 4-40 hex machine screws or similar. This clamp will provide secure closure of the cistern at the lower end. The inner surfaces of the cistern at the point of clamping will be lightly greased with petroleum jelly just prior to final clousure. These processes are represented by the photographs below:


First, a note about mercury toxicity. Like everything else, the toxicity of mercury, depends upon many factors. Among these are the oxidation state of mercury: mercury metal (in the zero oxidation state) exhibits only minor toxicity and, despite recent anxiety, instruments containing mercury are entirely safe in a domestic environment. The Romans drank mercury metal as laxative, the main risk of so doing was the density of the metal which meant that it could perforate the gut, but this was a purely mechanical risk rather than a chemical one. Mercury vapour would present a hazard only over a long period of time and for this reason it is advisable to avoid spillage. When mercury is spilled, very small globules can enter into cracks and fissures and possibly present a long term risk, but even then, only slight: exposed to the air mercury soon forms a coating of oxide which inhibits further evaporation. The best remedy for inaccessible spillage is to sprinkle flowers of sulphur which combines with the mercury to form the sulphide, which can then be removed with a vacuum cleaner. Mercury I chloride (Calomel), in the +1 oxidation state also has low toxicity and was widely prescribed by physicians in the 19th century. Mercury II Chloride, in the +2 oxidation state, however, is extremely poisonous but is not encountered in the use of mercury metal in barometers. Organo-mercury compounds also have a high toxicity but again, will not be encountered in the course of constructing barometers. There is a small concentration of mercury in the atmosphere, mostly from volcanic eruptions with which we have lived for centuries. Large scale industrial processes have, in the past, discharged mercury into rivers and since the metal can accumulate in shell-fish and other aquatic creatures, such discharges are highly regulated. Thus for use in barometers, mercury, properly handled, presents negligible risk. Mercury should be treated with care and proper respect, however, and should not be allowed contact with the skin through which, albeit slowly, it can be absorbed.
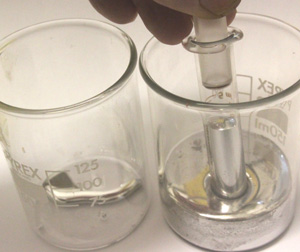
If the mercury was recovered from an old barometer, it may need cleaning before use in the restored instrument. There are several ways in which mercury can be cleaned. As mentioned above it may be squeezed through chamois leather, or distilled under vacuum or shaken with 5% nitric acid containing a little mercurous nitrate. All these methods present disproportionate difficulties to a restorer of a barometer. Apart from the obvious possibility of simply purchasing fresh mercury, there remains one simple method which provides mercury which is clean enough to function reasonably well in a barometer. The technique is to use a glass syringe (about 5ml in capacity) to draw mercury from the bulk of the contaminated sample and then to transfer this mercury into a clean receptacle. This is done repeatedly while ensuring that no mercury is drawn from the surface or from the bottom of the vessel. It is usually possible to transfer 80 - 90% of the mercury in this way. The following photographs illustrate this procedure:

The filling procedure is quite straightforward, but must be carried out carefully to avoid mercury spillage. The barometer tube and cistern described here requires about 40 ml of mercury with a weight of 0.544 kg.
The barometer tube is mounted in a clamp upside down with the open side of the cistern uppermost. The retort stand is placed in a shallow glass trough to contain any spillages with the barometer tube extending below the edge of the bench with the cistern just above bench height, as close to the glass trough as possible. Mercury is poured slowly into the cistern and allowed to fill the barometer tube and then about half to two-thirds of the total cistern volume. Any trapped air bubbles in the mercury in the barometer tube can be encouraged to rise to the surface by gentle tapping of the tube. (A plastic ruler on edge is useful for this as it allowes an effective transmission of shock without risking cracking of the tube.) During the removal of the bubbles from the mercury, the cistern will need to be supported manually to obviate spillage and loss of the mercury.
When any remaining trapped air has been thus removed, the cistern can be closed with the brass clamp. This is carefully positioned so that a small amount of air remains in the cistern and is secured by tightening the hex socket screws with an Allen key.
When the cistern has been closed securely, the barometer can be gently turned to the upright position whereupon the level of the mercury will fall in the barometer tube to a point which corresponds to the prevailing atmospheric pressure. The barometer should be allowed to stand, clamped vertically, for 24 hrs and then inspected for any leaks before mounting in the stick barometer case. The photographs on the right show the filled cistern and the mercury meniscus, and the completed barometer is shown in far right column.
