
ALL MATERIAL COPYRIGHT KEVIN SCOTT 2011. LINKS TO THIS SITE ARE WELCOME BUT DO NOT COPY MATERIAL FROM THIS SITE TO ANY OTHER WEBPAGE.


If you find this site useful, please support it by making a donation of $1 to help maintain and develop it. Click on the PAYPAL DONATE button to do this safely. But there is no obligation - please avail yourself of the information and facilities of the site at no charge.
 In 1942, Sir Charles
Boys rather belatedly wrote an account of a mercury barometer he
constructed some sixty years earlier using a capillary glass tube in
such a way as to obtain a very good Torricellian vacuum and thus an
instrument of considerable utility. His account written up in the
Journal of Scientific Instruments ( Vol 19, p168) demonstrates the
considerable skill he had as a glassblower and as an experimentalist.
His article is reproduced below.
In 1942, Sir Charles
Boys rather belatedly wrote an account of a mercury barometer he
constructed some sixty years earlier using a capillary glass tube in
such a way as to obtain a very good Torricellian vacuum and thus an
instrument of considerable utility. His account written up in the
Journal of Scientific Instruments ( Vol 19, p168) demonstrates the
considerable skill he had as a glassblower and as an experimentalist.
His article is reproduced below.
A Capillary Mercurial Barometer
By Sir Charles Boys, F.Inst.P.,
F.R.S.
J. Sci. Instrum. 19, p. 168 (1942)
In the early eighties of the last century I made for myself a capillary mercurial barometer which on account of its simplicity, the ease with which it may be constructed and the small amount of material consumed might seem to be a very second-rate affair, but which is in fact a far better instrument than many a barometer of conventional make, and it is unique in that I believe it might, if suitably packed, be sent by parcel post and be found to read correctly again when hung on a wall, and this without any manipulation of the instrument.
The materials required are : about a foot of rather thick-walled quill-glass tubing, about 1/4 Ib. of really pure mercury, vacuum distilled by preference, a strip of wood to carry the barometer tube, and about 3 in. of scale divided in inches or millimetres. The time required is about half an hour from start to finish if the materials are ready.
The glass tube should be washed really clean and dried. Then a bulb should be blown near one end a little more than an inch in diameter and very oblate, as shown in Fig. 95.
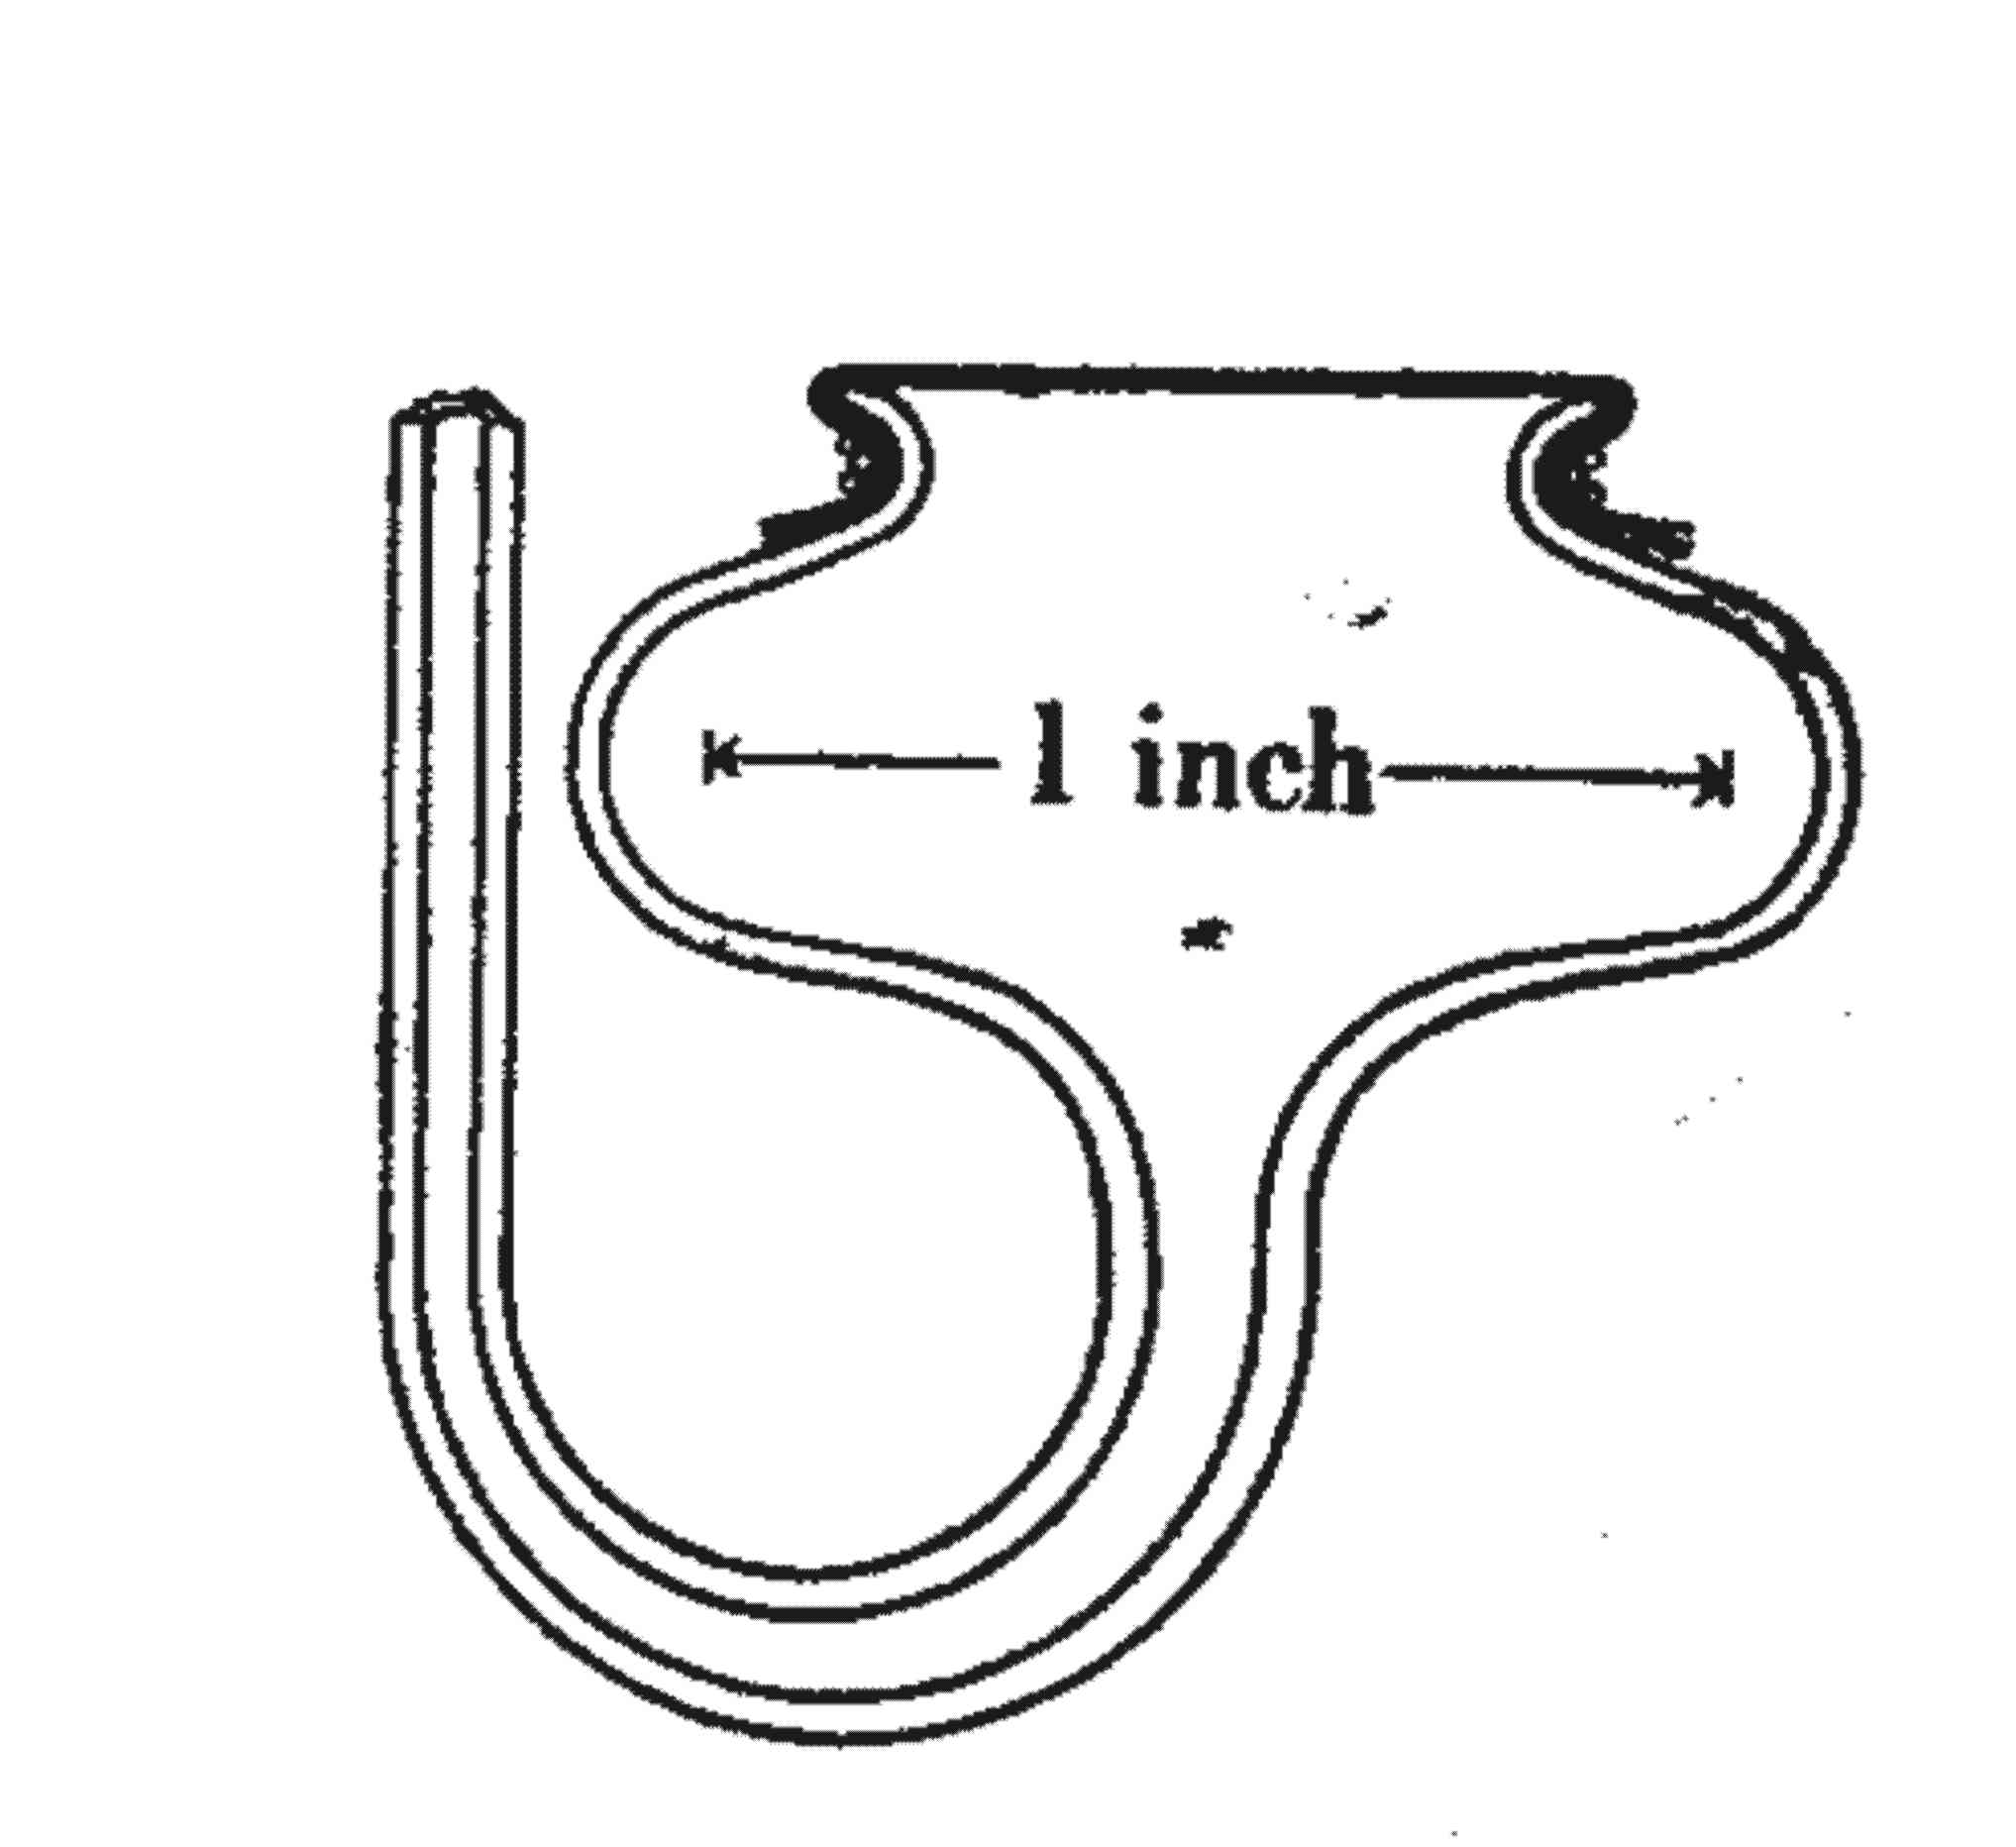
Then close to the bulb about 1 in. of the tube should be heated until quite soft and this should be drawn out into a tube 40 or 50 in. long and 1 mm. in bore or even less. Then break off the portion of tube beyond the capillary part leaving the tube open at the end. Now make a sharp cut in the glass tube on the other side of the bulb and very near to it and apply a hot spot of melted glass at the end of the cut to cause the tube to break off here. Heat the lip of the bulb with a small blowpipe flame until soft, and partly with the tang of a file and partly by spinning the bulb by turning the capillary tube between the finger and thumb to produce centrifugal force cause the opening to assume the form of a thistle funnel with a small but pronounced neck.
Next, and this should be done without any delay, the tapering tube close below the bulb should be heated in a bat's-wing gas flame and be bent into the form shown in the figure, and as soon as the hot glass has cooled to a temperature not less than that of the mercury already heated to make sure that it is dry, support the bulb and tube in an upright position, preferably upon the strip of wood already prepared to receive it, and pour in the hot mercury. Tie two or three thicknesses of fine linen over the thistle funnel so as to prevent mercury from running out or dirt from entering while leaving the mercury open to atmospheric pressure. Now slowly tilt the mounting until it is nearly horizontal, watching the mercury gradually filling the tube but not enclosing any bubbles. When the mercury has reached the end of the tube a small blowpipe flame is directed on to the capillary a few inches from the end when the mercury will part and the glass seal itself at the place and the loose end can be drawn off. Now gradually raise the upper end until the tube is vertical when the mercury will fall to very nearly its proper level. Above the mercury there is a very good vacuum. Any air that had begun to be adsorbed on the glass capillary will expand into the vacuum so that if the tube is once more brought horizontal this will be swept up to the end of the capillary where a second sealing through the mercury will leave it trapped.
By using glass immediately after it has been drawn the mercury comes into far more intimate contact than it ever would do with glass which had had time to collect on its surface gases and vapours. This is made evident by the brilliance of the reflexion of light from its surface and the freedom of movement of the mercury. The barometer is finally placed upright and the capillary neatly sealed again about 33 in. above the bulb and the superfluous tube removed. So far as I can remember I found the contact between the mercury and the glass so intimate that the whole column of mercury would remain suspended with the upper few inches in a state of tension.
The scale of inches or millimetres is then to be slipped behind the capillary and so placed that the mercury reading upon it agrees with that of a standard barometer in really good order. Thus the capillary depression is counteracted and the instrument is complete. If the cross-section of the capillary is not more than about 1/1000 of that of the bulb, the scale will not need adjustment.
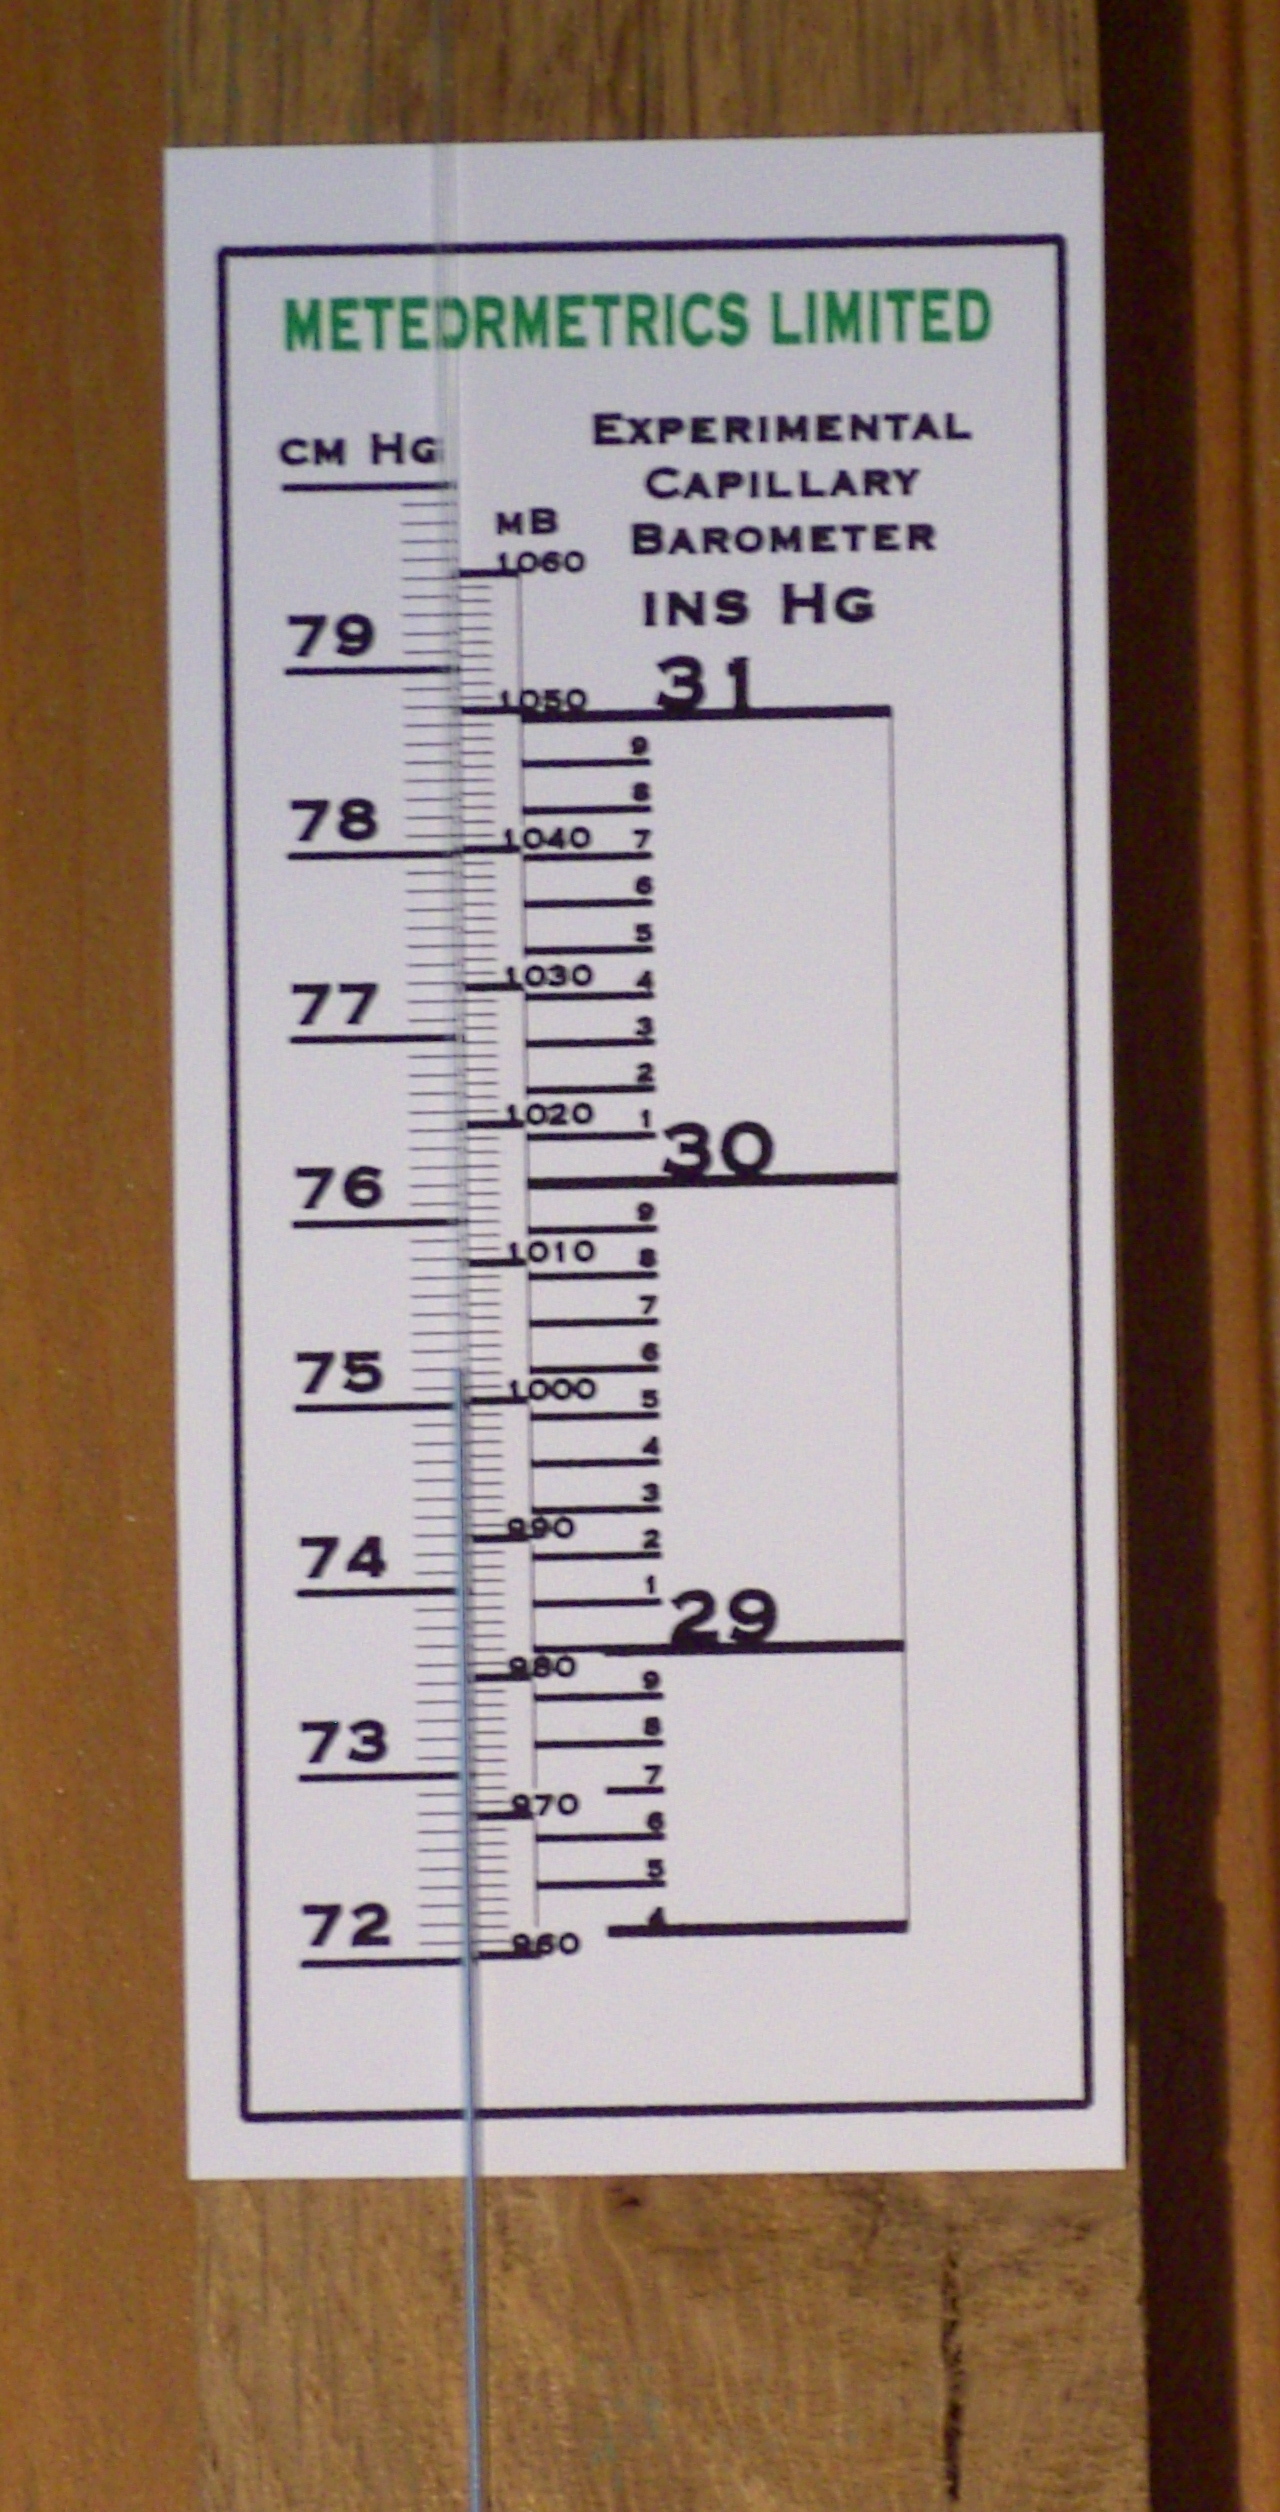
Above: The Scale of the Meteormetrics' Capillary Barometer calibrated in cm of mercury, mB and inches of mercury.
Below: The Bulb of the current version. In our case, 9mm OD x 4mm ID borosilicate glass was used. The bulb was blown first, but not so oblate as in Sir Charles Boys' case, so that a screw cap termination could be sealed on to the open end. This provided a closure for the barometer which would be secure enough for transit by post. In all other respects Sir Charles' procedure was followed exactly.
